Category: Uncategorized

  • 3D Perler Bead Patterns: Boxes, Figures & Sculptures Tutorial

    The short version: 3D perler bead projects use multiple flat panels ironed separately, then assembled into boxes, figures, dice, and sculptures. The key is even ironing on each panel and using glue or interlocking slots to connect them. This guide covers the 5 most popular 3D projects — from a simple gift box (1 hour) to a detailed dragon figure (weekend project).

    Flat bead art is step one. 3D is where the hobby gets addictive. By ironing separate panels and assembling them, you can build anything from a tiny dice to a foot-tall castle. The technique is simple: each panel is a standard fuse bead pattern. The magic is in the assembly.

    What you need for 3D

    • Multiple pegboards — at least 2-4 for multi-panel projects. See the pegboard size guide.
    • E6000 or craft glue — for permanent assembly. Hot glue works for temporary holds but weakens over time.
    • Even ironing technique — each panel must be uniformly fused. Read how to iron perler beads.
    • Patterns designed for 3D — regular 2D patterns do not work for 3D. You need patterns with matching edge lengths.

    5 Best 3D Perler Bead Projects

    1. Gift Box (Easy, 1 hour)

    Six square panels: bottom, 4 sides, lid. Each panel is a 15×15 grid. Iron each panel separately, then glue edges together. The lid can be a different color for contrast. Perfect for jewelry or candy gifts.

    2. Dice (Easy, 30 min)

    Six 10×10 panels with dot patterns for numbers 1-6. Iron lightly so edges remain bead-like for grip. Assemble with glue. Fun for board game replacements.

    3. Pencil Holder (Medium, 2 hours)

    Four tall side panels + a bottom square. 15×25 beads per side. Iron each panel, glue into a tube. Functional and decorative for your desk.

    4. 3D Character Figure (Hard, 4-6 hours)

    Popular in the kawaii community: front, back, and side profile panels assembled into a standing figure. Minecraft characters and Pokemon are the most common. Requires 6-10 panels with matching seam lines.

    5. Castle or House (Expert, Weekend+)

    Multi-room builds with 15+ panels. Walls, floors, roof pieces. The haunted house pattern can be adapted into 3D with additional side panels. These are display pieces for shelves and conventions.

    Assembly methods

    1. Glue method (easiest): Apply E6000 along edges, press panels together, clamp or tape until dry (1 hour). Best for boxes and holders.
    2. Slot method (advanced): Design panels with interlocking notches — leave every 3rd bead empty on one edge, and the matching panel has beads sticking out. No glue needed. Best for figures that need to be hollow or lightweight.
    3. Hinge method (for lids): Thread fishing line through beads on two adjacent edges, creating a flexible hinge. Works for boxes and containers.

    Common 3D mistakes

    • Uneven panels: If one side is ironed more than another, edges will not line up. Iron all panels the same duration.
    • Too much glue: E6000 expands slightly. A thin bead along the edge is enough. Excess glue oozes out and looks messy.
    • Weak joints: Panels ironed on one side only are weaker. For 3D, iron both sides of each panel.

    Ready to try 3D? Start with the gift box — it teaches you panel alignment and gluing without frustration. Pick a pattern from our free library or design your own with the pattern generator. Need exact bead counts? Check the bead count chart for multi-panel projects.

    By the PerlerBeadAI craft team. Our studio has a shelf of 3D boxes and figures. The dice gets the most comments.
    Published: August 2026

    Try one of our free printable charts — the Donut, the Friendly Ghost and the Friendly Ghost — each with exact bead counts and Perler, Hama and Artkal color codes.

  • What Are Perler Beads? Beginner Guide to Fuse Bead Crafting

    The short version: Perler beads (also called fuse beads, melty beads, or Hama beads) are small plastic cylinders — 5 mm diameter — that you place on a pegboard, then iron to melt together into permanent pixel art. They were invented in Sweden in the 1960s and are now used worldwide for keychains, magnets, wall art, jewelry, and more. They cost about $5-10 for a 1,000-bead mixed bag. One project takes 15 minutes to 4 hours depending on size.

    What exactly are Perler beads?

    Perler beads are 5 mm hollow plastic cylinders made of LDPE (low-density polyethylene). They are designed to sit on a pegboard — a plastic grid with tiny spikes spaced 5 mm apart. After you arrange beads into a design, you place parchment paper on top and iron at medium heat (135-150°C / 275-300°F) for 10-20 seconds. The heat melts the top of each bead just enough to fuse it to its neighbors. Once cooled, you have a single solid piece of plastic pixel art.

    “Perler” is a brand name — like Kleenex for tissues — owned by the Simplicity Creative Group. The generic term is “fuse beads” or “iron beads.” Other major brands are Hama (popular in Europe), Artkal (largest color selection), and Nabbi. They are all 5 mm, interchangeable on the same pegboards, and fuse at the same temperature. See our Perler vs Hama comparison for the full breakdown.

    What can you make with Perler beads?

    Almost anything flat or 3D that fits on a pegboard grid. Common projects ranked by time:

    • 15-30 min: keychains, fridge magnets, earrings, zipper pulls
    • 30-90 min: coasters, ornaments, backpack charms, desk decor
    • 2-4 hours: animal portraits, video game sprites, holiday scenes
    • Weekend+: wall art, 3D boxes, multi-board family portraits

    Browse 50+ project ideas in our complete ideas guide or grab free patterns from the pattern library.

    What do you need to get started?

    A complete beginner setup costs about $15-20 and covers your first 10-15 projects:

    • Pegboards: one 29×29 interlocking 4-pack ($6-8). This is the only board size you need — it handles every beginner pattern and connects to form bigger grids. See the pegboard size guide.
    • Beads: one 1,000-bead mixed-color bag ($5-10), plus separate bags of black and white ($3 each). You always run out of black and white first. Read how many beads you need.
    • Iron + parchment paper: you already own an iron. Parchment paper costs $3 at any grocery store.
    • Patterns: free from our pattern library (46 designs, all printable). Or make your own with the free pattern generator.

    Are Perler beads safe for kids?

    Yes, with age-appropriate supervision. Perler beads are made of food-grade LDPE plastic, BPA-free, and meet US and EU toy safety standards. The safety guidelines:

    • Under 3: not suitable — beads are a choking hazard.
    • Ages 5-7: fully supervised. Kids place beads; adult handles the iron.
    • Ages 8-11: mostly independent bead placement. Adult irons.
    • Ages 12+: independent except for the ironing step.

    Full age guide, learning benefits, and classroom tips in our Perler beads for kids article.

    Perler vs Hama vs Artkal: which brand?

    For your first projects, it barely matters. All three are 5 mm, interchangeable on the same pegboards, and fuse at the same temperature. The short version:

    BrandColorsWhere to buyBest for
    Perler103US/Canada (Michaels, Amazon)Beginners in North America
    Hama92Europe/UK (toy stores, Amazon EU)Beginners in Europe
    Artkal199Online (direct or Amazon)Color accuracy, large projects

    Much more detail in the full brand comparison with CIEDE2000 color-matching data.

    Where to buy Perler beads

    In the US: Michaels, Joann, Hobby Lobby, and Amazon. In Europe: most toy stores carry Hama beads. Online: Amazon carries all three brands. Specialty colors and bulk quantities (1,000+ single-color bags) are best ordered from the brand websites or Amazon. Check our bead shop for curated kits.

    Ready to start? Grab a free pattern, learn how to iron, or make your own design with the pattern generator — no signup needed.

    By the PerlerBeadAI craft team. We have answered this question at every craft fair for two years. Now it lives here.
    Published: August 2026

    Try one of our free printable charts — the Honey Bee, the Cherries and the Friendly Ghost — each with exact bead counts and Perler, Hama and Artkal color codes.

  • How to Iron Fuse Beads: Complete Step-by-Step Guide for Beginners

    The short version: set your iron to medium heat (no steam), cover beads with parchment paper, press for 10-20 seconds per side in a circular motion, then cool flat under a heavy book for 10 minutes. Small holes should still be visible after ironing. Full details: the masking-tape method for multi-board projects, how to fix over-melted beads, and the 3 most common mistakes.

    Ironing is the step that turns loose beads into art you can hold. Do it wrong: beads melt unevenly or not at all. Do it right: your project lasts decades. This guide covers every detail — temperature, timing, paper choice, the tape trick for big builds, and fixes for when things go wrong.

    What you need

    • Household iron — any standard iron. Turn steam OFF (water and hot plastic do not mix).
    • Parchment paper — or the ironing paper from bead kits. Never wax paper (it sticks) or aluminum foil (uneven heat).
    • Heat-safe flat surface — ironing board, craft table with towel, kitchen counter with cutting board.
    • Heavy book — for cooling flat. A large hardcover works perfectly.
    • Masking tape — optional but essential for multi-board projects (see below).

    Step 1: Set the right temperature

    Set your iron to medium heat — usually the “wool” or setting 4-5 on most irons. This is approximately 135-150°C (275-300°F). If your iron has temperature numbers, aim for the middle of the dial. Do not use the highest setting — beads melt too fast and strings of plastic form. Do not use the lowest — beads will not fuse at all. Test on a few spare beads first if you are unsure.

    Step 2: Cover with parchment paper

    Place a sheet of parchment paper over your completed bead design. The paper must be larger than the bead area — about 5 cm (2 inches) extra on all sides. This prevents accidental iron contact with bare beads. Do not use wax paper — it leaves a waxy residue that ruins the bead surface. If you bought a bead kit, use the ironing paper that came with it. Parchment paper from any grocery store works identically and costs about $3 for a roll that lasts years.

    Step 3: Iron in a circular motion

    Once the iron is hot, press it onto the parchment paper and move in slow, overlapping circles for about 10-20 seconds. You will see the bead circles start to show through the paper — that is normal and means melting is happening. Do not press hard (light pressure is enough) and do not leave the iron in one spot (it creates hot spots). Flip the whole piece over (paper stays on), and iron the back side for another 10-20 seconds. For thicker projects or if you want a stronger fuse, repeat on both sides for another 5-10 seconds.

    How to know it is done: the beads should be fused together so the piece does not fall apart when lifted, but the small holes in the center of each bead should still be visible. This is called a “light fuse” and it is the standard. If the holes close completely, you have a “full melt” — it is stronger but the design looks flattened.

    Step 4: Cool flat under weight

    Immediately after ironing, move the piece (still with paper on) to a flat surface, place a heavy book on top, and leave it for at least 10 minutes. This is not optional — hot beads warp as they cool if left unweighted. The paper peels off easily after cooling. If the piece sticks to the paper, it needs slightly less iron time next time. If beads fall off, it needs slightly more.

    The masking-tape method (for multi-board projects)

    Projects larger than one 29×29 pegboard cannot be ironed evenly in one pass — a household iron is not wide enough. The masking-tape method solves this:

    1. Cover the finished beads with strips of masking tape. Overlap strips slightly. Press firmly so every bead sticks to the tape.
    2. Carefully lift the taped piece off the pegboards. The beads stay attached to the tape.
    3. Flip it over — tape side down, bead side up. Now you can iron the back side directly.
    4. Iron in sections: each quadrant gets 15-20 seconds, then move to the next. Overlap at the seams.
    5. Peel off the tape after cooling. The tape leaves no residue on properly fused beads.

    This method is essential for 58×58 (2×2 boards) and larger pieces. Without it, the outer beads cool while you iron the center, creating weak seams.

    The 3 most common mistakes (and fixes)

    1. Over-melted (holes closed, flattened look): Iron was too hot or held too long. You cannot undo over-melting, but the piece is still usable — it is actually stronger. Drop the temperature one setting next time.

    2. Under-melted (beads fall off): Not enough iron time or temperature too low. Simply put the paper back on and iron again — you can always re-iron a piece that did not fuse enough.

    3. Warped while cooling: Piece was not weighted flat during cooling. If slightly warped, re-iron briefly and re-weight. If severely warped, the piece may be unsalvageable — prevention is everything. Always use the heavy-book step.

    One side vs both sides: which should you iron?

    Display pieces (hang on wall, put in frame): iron one side only. The un-ironed side keeps the full 3D bead shape which looks better through frame glass.

    Functional pieces (keychains, coasters, magnets): iron both sides. Daily handling needs the extra strength of a double-sided fuse.

    If you are making a pet portrait for framing, one side is enough. If you are making keychains or coasters, iron both sides.

    Safety: the rules that matter

    • Adults do the ironing. Kids place beads; grown-ups melt them. No exceptions under 16. See our kids safety guide for the full age breakdown.
    • Ventilate the room. Properly ironed beads at correct temperature produce minimal fumes, but open a window anyway.
    • Iron stays upright when not in use. Hot iron + unattended = fire risk. Unplug when done.

    Ready to start?

    Pick a small pattern from our free pattern library — the cherries or honey bee are the best first projects. Or make your own design with the free pattern generator. Need beads? Check our bead count guide to know exactly how many to buy before you start.

    By the PerlerBeadAI craft team. We have ironed thousands of pieces and broken every rule so you do not have to. The masking-tape method is the real deal — use it for anything over one board.
    Published: August 2026

    Try one of our free printable charts — the Friendly Ghost, the Friendly Ghost and the Friendly Ghost — each with exact bead counts and Perler, Hama and Artkal color codes.
  • Cute Perler Bead Patterns: Kawaii Food, Animals & Characters

    The short version: the cutest fuse bead patterns are food with faces, baby animals, and kawaii-style characters — all under 500 beads and under 2 hours. This collection picks the most adorable patterns from our free library, organized by theme: food, animals, Halloween, and holiday. Every pattern prints with exact bead counts and Perler/Hama/Artkal color codes.

    The kawaii aesthetic — big eyes, round shapes, soft colors — translates perfectly to fuse beads. A 5 mm bead is already the right size for one “pixel” of cute. These are the patterns that get the most reaction when we post them: gasps of “that is adorable” and immediate requests for the link.

    Cute Food Patterns

    Food with faces is the heart of kawaii beading. These patterns use 3-5 colors, take 30-60 minutes, and make the best fridge magnets and keychains.

    • Happy Avocado — 150 beads, 3 colors. The smiling pit sells it. 25 minutes.
    • Boba Milk Tea — 250 beads, 5 colors. The tapioca pearls are the detail that makes this special. 40 minutes.
    • Pink Frosted Donut — 180 beads, 4 colors. Rainbow sprinkles make it pop. 30 minutes.
    • Pair of Cherries — 90 beads, 2 colors. The easiest cute project. 15 minutes.
    • Sushi Roll — 220 beads, 5 colors. Tiny details, big cute. 45 minutes.

    Cute Animal Patterns

    Baby animals and round-faced critters. These make perfect nursery decor, backpack charms, and gifts for animal lovers.

    • Honey Bee — 120 beads, 3 colors. Round body, tiny wings, instant charm. 20 minutes.
    • Panda Face — 200 beads, 3 colors. Black and white never looked this soft. 35 minutes.
    • Koala Face — 140 beads, 3 colors. Those ears. 25 minutes.
    • Hedgehog — 180 beads, 4 colors. Tiny spikes, sweet face. 30 minutes.
    • Sloth on a Branch — 350 beads, 4 colors. The slow-life icon. 60 minutes.
    • Pink Flamingo — 320 beads, 4 colors. Tropical cute. 50 minutes.
    • Sitting Fox — 300 beads, 5 colors. Orange pops against any background. 50 minutes.

    Cute-but-Spooky (Halloween)

    Halloween patterns that are more adorable than scary. Perfect for kids who want to participate without nightmares.

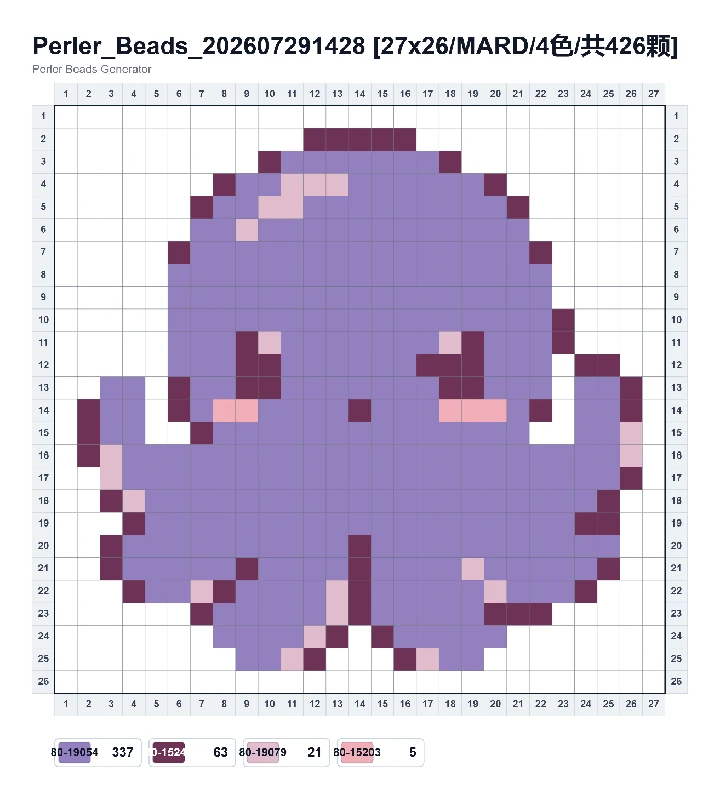
    • Friendly Ghost — 80 beads, 2 colors. Smiling sheet ghost. 15 minutes.
    • Black Cat — 334 beads, 2 colors. Classic Halloween, kawaii proportions. 45 minutes.
    • Candy Corn — 100 beads, 3 colors. The cutest candy. 15 minutes.
    • Jack-o-Lantern — 280 beads, 4 colors. Smiling pumpkin, not scary. 40 minutes.
    • Flying Bat — 160 beads, 2 colors. Round wings, tiny fangs. 25 minutes.

    Make your own cute pattern

    Have a cute idea that is not in the library? The AI pattern generator turns descriptions like “a smiling strawberry” or “a sleepy kitten” into bead patterns in seconds. Or convert a photo of your own pet with the photo pattern maker — pet portraits are the ultimate cute project.

    New to beading? Our beginner patterns guide ranks every pattern by difficulty. For ironing help, read how to iron perler beads. Need to know how many beads to buy? Bead count chart has exact numbers.

    By the PerlerBeadAI craft team. The avocado is our most-requested pattern at craft fairs. The boba tea is a close second.
    Published: August 2026

  • How to Make a Custom Pet Portrait in Perler Beads (Step by Step)

    How to Make a Custom Pet Portrait in Perler Beads (Step by Step)

    The short version: pick a sharp, front-facing photo with plain background, run it through the pet pattern converter at 50 pegs wide and 14 colors, clean up the eyes by hand, and budget 2–4 hours of beading for a portrait that actually looks like your pet.

    A pet portrait is the single most popular “serious” fuse bead project — and the one most people abandon after a muddy first try. The difference between a blob and a portrait you’d frame isn’t talent. It’s photo choice, grid size, and ten minutes of manual cleanup. Here’s the full process, step by step.

    Step 1: Choose the right photo (this is 70% of the result)

    The converter can only work with what the camera captured. A great source photo has four traits:

    • Front-facing, eyes open. Side profiles convert poorly — bead grids are too coarse to show a muzzle in profile. Face the camera.
    • One subject, tight crop. Head and shoulders only. A full-body shot wastes half your grid on floor and furniture.
    • Plain, contrasting background. A dark dog on a light couch converts beautifully; a golden retriever on a beige carpet merges into it.
    • Sharp focus, no motion blur. Blurry fur becomes random noise at bead scale. Zoom in on the eyes before you commit — if they’re not crisp, pick another photo.

    Take ten new photos rather than reusing an old favorite that fails these tests. Treats above the camera lens work wonders.

    Step 2: Convert with portrait settings

    Open the pet portrait converter — it loads the editor pre-tuned for animals: 50 pegs wide, 14 colors, realistic style, background removal on. Those numbers aren’t arbitrary:

    • 50 wide is the sweet spot for a face: enough pixels for eye shape and ear detail, still only four standard 29×29 pegboards.
    • 14 colors captures fur gradients without burying you in single-bead confetti. More colors ≠ better portrait.
    • Realistic style keeps shading; cartoon style flattens fur into poster blocks that rarely read as a specific animal.

    Drop your photo in, wait a few seconds, and you’ll see the grid preview with exact bead counts per color. If the preview looks like a smudge, go back to Step 1 — no setting rescues a bad photo.

    Step 3: Clean up the eyes and nose by hand

    Every converter makes the same three mistakes on pet faces. Fix them directly in the editor before you export — it takes ten minutes and doubles the likeness:

    1. Eyes first. Make both eyes the same color and the same size, usually 2×2 or 3×3 beads of the darkest brown or black in your palette. Add one white highlight bead at the same corner of each eye (top-left, say). Symmetry reads as “alive” at bead scale.
    2. Nose second. A dog or cat nose should be a solid dark block, 2–4 beads. Converters often dither it into three gray tones — pick the darkest and fill the whole nose.
    3. Delete the speckles. Single isolated beads in a contrasting color (the “pepper” in light fur) just look like errors. Click them away; the fur reads cleaner without them.

    Step 4: Export, count, and bead

    Export the pattern sheet and check the bead list. A 50×50 pet portrait typically lands between 1,800 and 2,400 beads — that’s 2–4 hours of placement for most people. Three field-tested tips:

    • Sort before you start. 14 colors sounds like a lot until they’re in labeled piles. Our bead-count guide shows how to read the usage table.
    • Work one color at a time, largest count first — the same method we recommend for all big pieces in the beginner patterns roundup.
    • Check brand codes. The sheet lists Perler codes by default; switch to Hama or Artkal in the palette picker and the counts update — our color library shows the exact cross-brand equivalents if you mix brands.

    Step 5: Iron it like a portrait, not a toy

    For a piece you’ll frame, aim for an even, medium melt — beads fused flat on top but still showing their holes. Over-ironing warps a 50-wide portrait visibly. Full timing and pressure details are in our ironing guide: medium heat, 10–15 seconds per side, heavy book on top while it cools.

    FAQ

    Can I do this for free?

    Yes — the editor includes 1 free AI conversion per day, and exporting/printing the pattern costs nothing. A pet portrait fits in one free conversion.

    What about cats vs. dogs vs. other pets?

    Same process. Cats convert slightly better (flatter faces, bolder markings). Rabbits and guinea pigs work if you crop tight on the face. Birds need high-contrast plumage to read at 50 pegs.

    My pet is black — will the detail survive?

    Mostly yes, if the photo is bright. The converter maps near-blacks to 3–4 dark browns, which is what keeps facial features visible. A badly lit black pet on a dark sofa will not convert — that one’s on the photo, not the tool.

    Can I make it smaller, like a keychain?

    Drop the width to 25–29 pegs in the editor before converting. You’ll lose fur texture but keep the silhouette and eyes — that’s the trade. For ready-made small designs, browse the animal pattern library instead.

    Related: the general photo-to-pattern guide covers people, logos, and landscapes; the cartoon avatar converter is a fun next project once your pet is on the wall.

    By the PerlerBeadAI craft team. We’ve converted hundreds of pet photos while tuning the pet preset — the eye-cleanup step above is the one trick that never fails.
    Published: July 2026

    Try one of our free printable charts — the Panda, the Fox and the Fox — each with exact bead counts and Perler, Hama and Artkal color codes.

    Or turn any photo into a pattern with our free pattern generator.

    Another favorite is the free Honey Bee chart.
  • 50+ Perler Bead Ideas: From Keychains to Wall Art

    50+ Perler Bead Ideas: From Keychains to Wall Art

    The short version: the best fuse bead projects for 2026 are one-board builds under 500 beads — keychains, magnets, ornaments and coaster sets. This list has 50+ ideas sorted by craft time, with 40 free printable patterns in our library to start tonight.

    Staring at a bucket of beads with no plan is the classic crafter’s block. This list fixes it: 50+ project ideas grouped by how long they take, from 15-minute keychains to weekend wall art. Every idea works with standard 5mm fuse beads (Perler, Hama or Artkal — the brands interlock on the same boards).

    Under 30 minutes: keychains, magnets & charms

    Small projects under 200 beads. These are the gateway crafts — ideal for kids’ first sessions, party favors, and using up leftover colors.

    • Keychains — cherries, a boba cup, a honey bee. Glue a keyring through a top bead or iron a loop of fishing line inside.
    • Fridge magnets — any small pattern + self-adhesive magnet strip on the back. Halloween magnets sell the whole October mood: ghost, candy corn, bat.
    • Backpack charms — frosted donut or avocado with a lobster clasp.
    • Earrings — two identical micro patterns (10–15 beads tall), jewelry hooks from any craft store.
    • Zipper pulls — initials or tiny hearts; iron lightly so they stay flexible.
    • Plant markers — a cherry for the cherry tomato pot. Hot-glue to a skewer.
    • Phone grip topper — one small motif glued to a blank pop grip.
    • Gift tags — bead the recipient’s initial, tie to the ribbon. Reusable every year.

    One evening: coasters, ornaments & desk decor

    200–600 beads, one standard pegboard. This is the sweet spot for weeknight crafting.

    • Coaster sets — four matching food patterns (sushi, boba, donut, avocado) make a giftable set. Cork backing stops scratches.
    • Holiday ornaments — anything from the Halloween collection with a ribbon loop: jack-o-lantern, black cat, moon & bat.
    • Animal portraits — the fox and panda are under 500 beads and look great framed in a 6×6 shadow box.
    • Suncatchers — iron translucent beads lightly and hang in a window.
    • Trinket dishes — iron a flat circle, then drape it over a small bowl while warm and press gently. It keeps the curve.
    • Bookends — two large flat panels glued to L-shaped bookend blanks.
    • Night light cover — a curved panel over an LED tea light (LED only, never a real flame).
    • Hair clips & bows — small motifs on alligator clips; big in the kawaii communities.
    • Desk pixel art — a mini easel + one 29×29 pattern beats a stress ball.

    Weekend builds: wall art, portraits & 3D

    1,000+ beads, multi-board or multi-session. Plan these with exact counts first — our bead-count guide keeps you from running out of black at 11 pm.

    • Pet portraits — the weekend project with the biggest emotional payoff. Convert a photo with the pet converter, then follow our step-by-step portrait guide.
    • Family portraits — cartoon-style, one board per person: family converter.
    • Pixel art wall grids — 4–16 boards tiled into retro game scenes or geometric art.
    • 3D boxes & dice — six ironed panels slot together; hundreds of free 3D nets exist in the community.
    • Wedding gifts — couple portrait + wedding date, framed: wedding converter.
    • Holiday village — a haunted house centerpiece with ghost and pumpkin scatter pieces.
    • Lampshade panels — four curved panels on a wire frame (LED bulb only).

    Ideas by occasion

    • Birthdays — age-number magnets, favorite-animal charm, bead “cake topper”.
    • Halloween — window silhouettes, candy-bucket tags, costume pins. Our Halloween pattern roundup has 25 ready designs.
    • Christmas — tree ornaments, advent calendar charms, stocking name tags. The Christmas roundup covers 20.
    • Teacher gifts — coaster set + a bead apple charm.
    • Baby showers — pastel animal mobiles (light ironing, parental assembly only).
    • Party activity — pre-sorted mini kits: one small pattern + exact beads per guest.

    FAQ

    What’s the best first project ever?

    A fridge magnet under 200 beads — the honey bee or cherries. You learn placement, ironing and finishing in one 20-minute session. See the 25 beginner patterns and our easy patterns collection for more ranked by difficulty.

    How do I attach beads to things?

    E6000 or hot glue for magnets, clips and grips. For keychains, thread the ring through a top bead before ironing, or glue a bail to the back. Never iron hardware into beads.

    Where do I get patterns for these?

    40 free printables live in the pattern library (Halloween, animals, food — more added weekly). Or convert any photo with the free generator.

    How many beads should I stock for these projects?

    A 1,000-bead mixed bag covers a dozen small projects. For portraits, buy by the usage table on your pattern sheet — black, white and your subject’s main fur/color make up 80% of the count.

    By the PerlerBeadAI craft team. Every idea here was built and ironed in our studio — the coaster-set warning comes from experience.
    Published: July 2026

  • What Size Pegboard Do I Need? (29×29 vs 58×58 vs Multi-Board)

    What Size Pegboard Do I Need? (29×29 vs 58×58 vs Multi-Board)

    The short version: the standard fuse bead pegboard is 29×29 pegs (about 14.5 cm / 5.7 in square), and one board covers most beginner patterns. Go 58×58 (four boards) for portraits and detailed scenes; go multi-board only for wall art you plan to frame.

    Pegboard size decides everything downstream: how detailed your pattern can be, how many beads you’ll need, how long the build takes, and whether the result fits a keychain or a wall. Here’s how the sizes actually compare — with real numbers, not guesses.

    The three sizes that matter

    SizeBeads (full)Physical sizeBest forTypical time
    29×29 (1 board)841~14.5 cm squareKeychains, magnets, ornaments, all beginner patterns30–90 min
    58×58 (2×2 boards)3,364~29 cm squarePet portraits, detailed scenes, gifts3–6 hours
    116×116+ (4×4 boards)13,456+~58 cm squareFramed wall art, pixel-art gridsWeekend+

    Full-coverage counts are the ceiling — real patterns use 40–70% of the grid. A typical one-board design from our pattern library runs 200–450 beads, not 841.

    29×29: the default board

    Every major brand sells the same 29×29 square board, and they interlock with each other regardless of brand — Perler beads on a Hama board, no problem (more on that in Perler vs. Hama). One board handles:

    • All 40 patterns in our easy patterns and free library (25×25 to 27×27 grids)
    • Anything destined to be a keychain, magnet, ornament or coaster
    • Kids’ projects — a child finishes a board in one sitting

    Buy these in the interlocking 4-pack; they’re the same boards you’ll tile for bigger builds later.

    58×58: portrait territory

    Four interlocked boards double your resolution in both directions — 4× the detail. This is the minimum for a recognizable pet portrait: at 50–58 pegs wide, eyes get 2–3 beads each and fur gets real gradients. Our photo converters default to this range for exactly that reason.

    Two honest warnings about 58×58 builds: they use 1,800–2,400 beads (check the count guide before starting), and they’re floppy until ironed — move them on a flat tray, never by hand.

    Multi-board monsters (104×104 and up)

    Sixteen boards and beyond is wall-art scale. At this size you’re producing pieces people frame and hang — pixel-art game scenes, geometric art, life-size portraits. Practical notes:

    • Iron in sections. A household iron can’t press 58 cm evenly. Tape the seams, iron quadrant by quadrant, then re-press the joins. Our ironing guide has the masking-tape method.
    • Budget 10,000+ beads and buy brand-consistent bags — mixing batches can shift colors. The color library maps exact codes across Perler, Hama and Artkal if you must mix.
    • Large grids need Premium. Our free editor tops out at 52×52; 78/104/156-wide canvases are a Premium feature.

    Specialty boards: circles, hexagons, peg shapes

    Round boards (about 26 pegs across) and hexagon boards exist for mandalas and flowers. They’re fun but limiting — patterns are square-grid by nature, so round boards force you to crop designs into a circle. Buy these after you’re bored with squares, not before.

    Which size should YOU buy?

    1. Just starting / buying for a kid: one interlocking 29×29 4-pack. Nothing else needed.
    2. Want to make a pet portrait this month: the same 4-pack — it tiles to 58×58.
    3. Planning framed wall art: two 4-packs (8 boards) minimum, plus a flat baking tray dedicated to moving builds.

    FAQ

    Do pegboards from different brands connect?

    Mostly yes. Perler, Hama and generic 5mm boards share peg spacing and interlock. Off-brand boards occasionally have looser tabs — test one pair before a big build.

    What about mini beads?

    Mini beads (2.6mm) use completely different, smaller boards — nothing interchanges with 5mm gear. They’re for experienced beaders making jewelry-scale art.

    My pattern is 31 pegs wide — what do I do?

    Tile two boards (58 wide) or shrink the pattern to 29 in the editor. Never cut pegboards — they crack along the peg lines.

    How do I keep a big build from falling apart mid-move?

    Build on a rigid tray from the start. If you must move a loose build, slide a sheet of stiff cardboard underneath and carry it flat — 10 seconds of caution beats re-placing 800 beads.

    By the PerlerBeadAI craft team. We’ve cracked boards and spilled portraits so you don’t have to.
    Published: July 2026

    Try one of our free printable charts — the Honey Bee, the Cherries and the Friendly Ghost — each with exact bead counts and Perler, Hama and Artkal color codes.

  • Perler Beads for Kids: Age Guide, Safety & 5 Learning Benefits

    Perler Beads for Kids: Age Guide, Safety & 5 Learning Benefits

    The short version: fuse beads are right for kids 5 and up — 5–7 with full supervision, 8+ mostly independent. An adult always does the ironing. Beyond being fun, they build fine motor control, color recognition, counting, planning and patience — which is why occupational therapists have used them for decades.

    Fuse beads look like simple toys, but child-development professionals treat them as therapy tools. Here’s the honest age guide, the real safety rules (including the one most blogs skip), and what kids actually learn from a tub of beads.

    Age guide: who’s ready when

    AgeWhat worksSupervision
    Under 3Nothing — beads are a choking hazard. Keep the tub closed.Not suitable
    3–4Maxi beads (10mm, different system) with 1-on-1 helpConstant, hands-on
    5–7Standard 5mm beads, small patterns (<200 beads), peg-by-peg helpAdult in the room the whole time
    8–11Full patterns, color planning, simple photo conversionsCheck-ins; adult irons
    12+Multi-board portraits, own designs in the editorIndependent except large irons

    Safety: the three rules that actually matter

    1. The iron is an adult tool, always. Medium heat, 10–20 seconds, ironing paper between iron and beads — the full method is in our ironing guide. Kids place beads; grown-ups melt them. No exceptions at any age under 16.
    2. Under 3s stay away. A 5mm bead is exactly airway-sized. Craft at a table, sweep the floor after, and store beads in a latched tub — not a bag a toddler can rip.
    3. Ventilate the ironing session. Properly ironed beads at correct temperature produce minimal odor, but crack a window anyway and never leave beads melting unattended.

    5 learning benefits (the real ones)

    1. Fine motor precision

    Picking up a 5mm cylinder and placing it on a 2.5mm peg is a pincer-grip workout — the same grip handwriting depends on. Therapists use bead tasks to rebuild this exact motion; a 20-minute session is dozens of repetitions disguised as play.

    2. Color recognition and sorting

    Matching bead to pattern square teaches color discrimination at a fine level — is this “light pink” or “blush”? Our color library shows just how many near-shades exist; kids who bead get good at telling them apart.

    3. Counting and early math

    “We need 12 orange beads for the pumpkin” is arithmetic with stakes. Older kids can read the bead-count table on the pattern sheet and estimate totals — sneaky practice with numbers up to 500. See how counts work in our bead math guide.

    4. Planning and sequential thinking

    A pattern is an algorithm: place row by row, one color at a time, check against the chart. Kids who rush learn that skipping steps means pulling beads out later — a gentle, concrete lesson in process discipline.

    5. Frustration tolerance and finishing

    A bumped board scatters 200 beads. Every beading kid bumps a board eventually — and rebuilds. Finishing a physical object they can hold, gift and display is a confidence loop that screens simply don’t provide.

    Best first projects by age

    FAQ

    Are fuse beads toxic?

    Major brands (Perler, Hama, Artkal) are food-grade-safe LDPE plastic, BPA-free, and meet US/EU toy standards. They’re not food, though — mouthing beads is a no, and off-brand beads without safety marks aren’t worth the savings.

    What if my child eats a bead?

    A swallowed bead typically passes without issue, but call your pediatrician or poison control for guidance — don’t wait for symptoms. Multiple beads or any breathing difficulty means immediate medical help.

    How do I keep beads organized with kids around?

    A divided craft box with a latching lid, one compartment per color family. Zip bags inside tubs pop open and create rainbow carpet. Sort by color family, not exact shade — kids find “reds” faster than “80-19063”.

    Can we do this as a classroom activity?

    Yes — it scales well. One board per child, pre-sorted bead cups, patterns under 200 beads, and one ironing station run by the teacher. Our free pattern library is printable for exactly this.

    By the PerlerBeadAI craft team. Written with input from parents and one very patient occupational therapist.
    Published: July 2026

  • 7 Ways to Display & Gift Finished Perler Bead Art (Frames, Magnets, Keychains)

    7 Ways to Display & Gift Finished Perler Bead Art (Frames, Magnets, Keychains)

    The short version: finished bead art lasts decades if you display it right — frame flat pieces in shadow boxes, turn small ones into magnets and keychains, and mount ornaments with ribbon. The seven methods below cover everything from a 200-bead charm to a 10,000-bead portrait.

    You spent four hours placing 2,000 beads. Don’t let the result live in a drawer. These are the seven display methods that actually survive dust, sunlight and toddlers — ranked from “tonight” to “weekend project”.

    1. Shadow box frames (the portrait standard)

    A shadow box is the best-looking way to display any flat bead piece, and the only method that fully protects it from dust. Use a box frame with 1–2 cm of depth, center the piece on acid-free card, and fix it with two small dabs of museum putty — never glue, which can fog beads over time. A 58×58 portrait fits a 12×12 in frame; one-board pieces sit nicely in 6×6.

    Hang out of direct sunlight. LDPE plastic holds color well, but years of UV will fade the reds first.

    2. Fridge magnets (the five-minute finish)

    Self-adhesive magnetic strip, cut to size, stuck on the back. That’s it. This is the natural habitat of every ghost, donut and bee you’ll ever make. Use two strips for pieces wider than 10 cm so they don’t twist off the door.

    3. Keychains and bag charms

    Thread a split ring through a top bead before ironing — the melt locks it in permanently. For finished pieces without a ring hole, glue a jewelry bail to the back with E6000. Keychain pieces take daily abuse, so iron them slightly longer than display pieces: you want the beads fused on the back side too. Small, dense designs survive pockets best — cherries beat a spider web.

    4. Ornaments and seasonal garlands

    Ribbon loop through a top bead, knot, done. Halloween pieces (pumpkin, black cat, bat) hang in windows from October 1st; Christmas ones rotate in December — see the Halloween and Christmas roundups for the full sets. String a dozen on baker’s twine and you have a garland that outlasts every paper version.

    5. Easel and shelf display

    A one-board piece stands upright on a $2 plate stand or mini easel — the fastest way to get pixel art onto a desk, bookshelf or nursery shelf. Lean medium pieces (up to 29×29) against a raised lip; anything bigger needs a frame. Rotate pieces seasonally and the shelf never goes stale.

    6. Functional mounting: coasters, boxes, boards

    Coaster sets work best glued to 4 mm cork sheet with craft glue — the cork grips the table and protects it from condensation. Larger flat panels can top a wooden keepsake box or cover a clipboard (use E6000, clamp overnight). Functional pieces get touched daily, so iron them to a full melt on both sides; a light melt will loosen under handling.

    7. The gallery wall (for the obsessed)

    Once you have five or more framed pieces, group them: one large portrait as anchor, small frames orbiting in a loose grid, 5 cm apart. Mixed bead art + family photos looks intentional; bead-only walls look like a studio (fine too). Multi-board wall art belongs here — if you’re planning one, read the pegboard size guide first and check bead counts with our count calculator guide.

    Gifting notes

    • Wrap flat. Bead pieces crack along seam lines if bent — wrap in tissue, box, then wrap the box.
    • Add the pattern card. A printout of the pattern (every sheet in our library is free) turns a gift into a craft kit.
    • Portraits travel framed. A pet portrait in its shadow box survives shipping; loose, it won’t.

    FAQ

    Do bead colors fade in sunlight?

    Slowly, yes — UV fades the reds and pinks first over years. Indoor display away from south-facing windows keeps colors true essentially forever. Cars and porches are the killers; don’t mount bead art there.

    How do I dust displayed pieces?

    Compressed air or a soft makeup brush. Never wet-wipe unframed pieces — water sits in the bead holes and spots the surface. Shadow boxes need only exterior glass cleaning.

    Can I hang pieces without frames?

    Yes — two removable adhesive strips on the back hold a one-board piece on smooth walls. For anything you’ve invested hours in, frame it; strips fail eventually and the floor is unforgiving.

    What’s the best gift for a non-crafter?

    A framed pet portrait or a coaster set. Both read as “real” gifts rather than crafts — the pet converter plus one evening of beading gets you there. New to this? Start with the beginner patterns to build up speed first.

    By the PerlerBeadAI craft team. Our studio wall currently holds 23 framed pieces and counting.
    Published: July 2026

    Or turn any photo into a pattern with our free pattern generator.

  • Perler vs Hama Beads: An Honest Comparison

    Perler vs Hama Beads: An Honest Comparison

    TL;DR: Perler and Hama beads are both 5 mm fuse beads that work identically on the same pegboards and fuse at the same temperature — you can mix them in one project. The real differences: Perler has 103 colors (US/easiest to find), Hama has 92 (EU standard), and their “same-named” colors differ by up to ΔE 5+, so pick one brand per project when color accuracy matters.

    New to fuse beads? Read what are Perler beads first. It.s the first question every new beader asks standing in the craft aisle: Perler or Hama? The good news is the answer barely matters for your first projects — they’re the same size, same shape, same ironing process, and they fuse together happily. The differences that do matter show up later: color ranges, regional availability, and price. Here’s the honest breakdown from a bench that uses both.

    The short version

    PerlerHama
    Bead size5 mm midi5 mm midi
    Colors in standard line10392
    Pegboard compatibleYes, both waysYes, both ways
    Fuse togetherYes — same 135–150 °C window
    Where it’s easiest to buyUS, CanadaEurope, UK
    Also offersMini (2.6 mm), biggie beadsMini (2.5 mm), maxi beads

    Do they actually work together?

    Yes, completely. Both brands are 5 mm tall, 5 mm diameter polyethylene cylinders. They sit identically on any standard pegboard (either brand’s boards, or third-party ones), and they fuse in the same temperature window — in our ironing tests, mixed-brand pieces came out indistinguishable from single-brand ones. The only caution is color: a Perler red and a Hama red side by side in the same area can look slightly different after fusing, so mix freely for fill areas but match brands where a color needs to be uniform.

    Colors: where the real difference lives

    Perler’s standard line runs 103 colors; Hama’s runs 92. But the count matters less than the mapping — only about a quarter of colors have a close equivalent in the other brand. We computed this properly: using CIEDE2000 color-difference math against a 291-color reference set, only 12 colors matched Hama excellently (ΔE < 2) and just 3 matched Perler excellently. In practice: if a pattern lists Hama codes and you bead in Perler, expect roughly one color in four to come out visibly different. The full numbers are in our Color Data Report, and every color’s closest cross-brand match is searchable in the color library.

    Availability: buy what’s near you

    This is the most practical difference. Perler dominates US craft stores (Michaels, Joann, Amazon US); Hama dominates Europe (most toy stores, Amazon EU). Importing the other brand is always possible but rarely worth it for standard colors — shipping costs more than the beads. Artkal, the third major brand, is worth knowing if you order online anyway: its S series runs 199 colors, the largest line anywhere, and it’s the best cross-brand matcher in our data.

    Quality: what we actually noticed

    Honest bench notes from hundreds of fused pieces: Perler beads are marginally more uniform in height, which matters on big flat pieces where one tall bead shows. Hama colors tend to run slightly more saturated, which photographs beautifully. Both brands occasionally ship a malformed bead in a bag (a “dud” with no hole or a half-height piece) at roughly the same rate — sorting them out while placing takes seconds. Neither brand has a meaningful durability difference after fusing; pieces from both survive years of handling.

    Which should a beginner buy?

    Buy whichever is on the shelf near you, in a mixed-color bag of 1,000+, plus black and white separately (you always run out of those first). That’s the whole answer for months one through three. When you outgrow it, pick patterns designed for your brand — or use the free editor, which re-matches any pattern to Perler, Hama, or Artkal palettes automatically, so the bead list you print is the one you can actually buy.

    Perler vs Hama FAQ

    Can you mix Perler and Hama beads in one project?

    Yes — same size, same fusing temperature, same pegboards. Mix freely for multicolor fills; keep one brand where a large single-color area needs to look perfectly uniform.

    Do Perler and Hama pegboards work for both brands?

    Yes. Both are 5 mm peg spacing; any standard midi pegboard from any brand holds either bead.

    Which brand has more colors?

    Perler has 103 in its standard line, Hama 92 — but Artkal S beats both at 199. More important than count is cross-brand matching: see our Color Data Report for the full ΔE data.

    Is one brand better for kids?

    They’re equivalent — same size, same safety profile, both for ages 6+ with adult ironing. For under-6s, both brands make larger beads (Perler Biggie, Hama Maxi) that are easier on small fingers.

    Written by the PerlerBeadAI craft team. We bead with both brands weekly; the color numbers here come from our own CIEDE2000 dataset.
    Last updated: July 2026

    Try one of our free printable charts — the Honey Bee, the Cherries and the Friendly Ghost — each with exact bead counts and Perler, Hama and Artkal color codes.